Hi,
First of all, here's a few things to know:
- My laptop has 2 hard drives
- I have a genuine DVD of Windows 7 Home Premium 32 bit
- The drive that I originally installed Windows on is starting to fail (1st drive), so I want to move the OS to the other drive (2nd drive).
- I have a cloned backup of Windows and all my programs and settings, etc. I did this using Paragon Backup & Recovery (free edition).
- From my backup image, I have recovered the OS to the other drive (2nd drive). Then I got boot up problems (wouldn't boot) so I used the Windows 7 DVD to System Repair. This allowed me to boot up, but it seems to have created a System reserved partition on the 1st drive (I want everything on the 2nd drive), and everything else seems to be on the other drive (1st drive).
- I copied the System reserved partition on the 1st drive to the 2nd drive (I think I uses Easus Partition Master, free edition). However, when I delete the System reserved partition from the 1st drive I once again can't boot up and have to do the System Repair again.
- I've tried several different tools to try changing active partitions, etc, but I'm just not knowledgeable enough to know what I'm doing .
.
So, here I am looking for help
Any ideas what I can try? I'm a total newbie at this stuff, so any help would be appreciated. I've included a screen capture of my Computer Management window.
Thanks

First of all, here's a few things to know:
- My laptop has 2 hard drives
- I have a genuine DVD of Windows 7 Home Premium 32 bit
- The drive that I originally installed Windows on is starting to fail (1st drive), so I want to move the OS to the other drive (2nd drive).
- I have a cloned backup of Windows and all my programs and settings, etc. I did this using Paragon Backup & Recovery (free edition).
- From my backup image, I have recovered the OS to the other drive (2nd drive). Then I got boot up problems (wouldn't boot) so I used the Windows 7 DVD to System Repair. This allowed me to boot up, but it seems to have created a System reserved partition on the 1st drive (I want everything on the 2nd drive), and everything else seems to be on the other drive (1st drive).
- I copied the System reserved partition on the 1st drive to the 2nd drive (I think I uses Easus Partition Master, free edition). However, when I delete the System reserved partition from the 1st drive I once again can't boot up and have to do the System Repair again.
- I've tried several different tools to try changing active partitions, etc, but I'm just not knowledgeable enough to know what I'm doing
.So, here I am looking for help
Any ideas what I can try? I'm a total newbie at this stuff, so any help would be appreciated. I've included a screen capture of my Computer Management window.
Thanks
Hello liverpaul, welcome to Seven Forums!
You have to power down the PC and disconnect the Disk 0 and connect the Disk 1 to the #1 SATA port on the motherboard and set that as the second boot device after the CD/DVD drive and boot the Windows 7 disk to first mark the Windows 7 partition as Active then run the 3 separate startup repairs with restarts discussed in this tutorial at this link below to make the Windows 7 partition the "System" partition.
Startup Repair - Run 3 Separate Times
Be sure to post back with any further questions you may have and to keep us informed.
Unplug Disk0. or Wipe or mark System Reserved Inactive using free Partition Wizard bootable CD.
Now rightclick your System partition on Disk1, delete it and create a New Primary partition of 200mb, mark it Active.
Next boot the Win7 Repair CD or DVD Repair console to run Startup Repair up to 3 separate times (not including the first offered repair), to write the System boot files to the System partition and the Repair console to your F8 Advanced Boot Tools menu.
If this fails to start Win7, from DIsk tab on booted PW CD, select Rebuild MBR.
If that fails, delete the System partiiton and mark Win7 partiiton itself Active, then run Startup Repair x3.
Report back and we will look at other options, including copying out your files using the Load Drivers mini-explorer on Install or Repair disks, and clean reinstalling.
Hello liverpaul, welcome to Seven Forums!
You have to power down the PC and disconnect the Disk 0 and connect the Disk 1 to the #1 SATA port on the motherboard and set that as the second boot device after the CD/DVD drive and boot the Windows 7 disk to first mark the Windows 7 partition as Active then run the 3 startup repairs discussed in this tutorial at this link below.
Startup Repair - Run 3 Separate Times
Be sure to post back with any further questions you may have and to keep us informed.
 ). If that's the only way to do it then I'll have a look at how easy/difficult it is to access the hard drives.
If I decide that opening up my laptop is too difficult/risky, will I be able to do a clean install of Windows onto the 2nd drive will no problems?
Unplug Disk0. or Wipe or mark System Reserved Inactive using free Partition Wizard bootable CD.
Now rightclick your System partition on Disk1, delete it and create a New Primary partition of 200mb, mark it Active.
Next boot the Win7 Repair CD or DVD Repair console to run Startup Repair up to 3 separate times (not including the first offered repair), to write the System boot files to the System partition and the Repair console to your F8 Advanced Boot Tools menu.
If this fails to start Win7, from DIsk tab on booted PW CD, select Rebuild MBR.
If that fails, delete the System partiiton and mark Win7 partiiton itself Active, then run Startup Repair x3.
Report back and we will look at other options, including copying out your files using the Load Drivers mini-explorer on Install or Repair disks, and clean reinstalling.
Now rightclick your System partition on Disk1, delete it and create a New Primary partition of 200mb, mark it Active.
Next boot the Win7 Repair CD or DVD Repair console to run Startup Repair up to 3 separate times (not including the first offered repair), to write the System boot files to the System partition and the Repair console to your F8 Advanced Boot Tools menu.
If this fails to start Win7, from DIsk tab on booted PW CD, select Rebuild MBR.
If that fails, delete the System partiiton and mark Win7 partiiton itself Active, then run Startup Repair x3.
Report back and we will look at other options, including copying out your files using the Load Drivers mini-explorer on Install or Repair disks, and clean reinstalling.
Quote:
Wipe or mark System Reserved Inactive using free Partition Wizard bootable CD
Thanks
Don't open the lappy, use Option Three in this tutorial to wipe secure erase the Disk 0 and mark Windows 7 active and do the startup repairs.
Partition Wizard : Use the Bootable CD
Partition Wizard : Use the Bootable CD
Don't open the lappy, use Option Three in this tutorial to wipesecure erase the Disk 0 and mark Windows 7 active and do the startup repairs.
Partition Wizard : Use the Bootable CD
Partition Wizard : Use the Bootable CD
If you want a System Reserved partition for the Repair Console it places on F8 boot menu, you need to reconstruct it per the steps given earlier, mark it Active and run Startup Repair x3.
If you don't want the SysReserved partition then delete it, mark Win7 partition active and run the repairs.
If you don't want the SysReserved partition then delete it, mark Win7 partition active and run the repairs.
Update:
I tried the above methods but each time I do Startup Repair, it runs for over an hour before I eventually get the following error message.
Right now, I can no longer get Windows running so I'm posting from my phone!
Any ideas that I can try now? I'd love to be able to get my original backup working again, but I am aware that I may have to do a clean install and lose all my programs and settings. All my data is backed up, so at least that's safe.
Try the Bootrec commands directly as per the MS guidance.
How to use the Bootrec.exe tool in the Windows Recovery Environment to troubleshoot and repair startup issues in Windows
This has solved your problem for others. Don't forget the BCD rebuild.
Does this problem occur with disk 0 connected or disconnected?
How to use the Bootrec.exe tool in the Windows Recovery Environment to troubleshoot and repair startup issues in Windows
This has solved your problem for others. Don't forget the BCD rebuild.
Does this problem occur with disk 0 connected or disconnected?
Try the Bootrec commands directly as per the MS guidance.
How to use the Bootrec.exe tool in the Windows Recovery Environment to troubleshoot and repair startup issues in Windows
This has solved your problem for others. Don't forget the BCD rebuild.
How to use the Bootrec.exe tool in the Windows Recovery Environment to troubleshoot and repair startup issues in Windows
This has solved your problem for others. Don't forget the BCD rebuild.
Hello again.
Too bad, perhaps the partition manager you used FUBAR'd the partition for you, just use Partition Wizard from now on mate.
You're still liable to have issues with Windows creating the "System Reserved" partition to Disk 0 as long as it's still connected though you can't disconnect it because it's a lappy.
There may be a way around it though by doing a wipe to the Disk 1 (if you reinstall) and using the outline in Step Two #3 of the tutorial at the link below to create a SysResv partition and marking that Active after the clean all and before the install.
Have a good look through the information below.
 �� Information
After you have copied out or made back-ups of the data you need to save to external media, use Step One of this tutorial at the first link below to do a wipe (secure erase) to the entire Hard Disk Drive / Solid State Drive.
SSD / HDD : Optimize for Windows Reinstallation
DISKPART : At PC Startup
Too bad, perhaps the partition manager you used FUBAR'd the partition for you, just use Partition Wizard from now on mate.
You're still liable to have issues with Windows creating the "System Reserved" partition to Disk 0 as long as it's still connected though you can't disconnect it because it's a lappy.
There may be a way around it though by doing a wipe to the Disk 1 (if you reinstall) and using the outline in Step Two #3 of the tutorial at the link below to create a SysResv partition and marking that Active after the clean all and before the install.
Have a good look through the information below.
After you have copied out or made back-ups of the data you need to save to external media, use Step One of this tutorial at the first link below to do a wipe (secure erase) to the entire Hard Disk Drive / Solid State Drive.
- Then if you do not want to create the new Windows 7 "System Reserved" partition use the outline in Step Two #2 to create, format and mark Active a single 100GB partition to do the installation to.
- If you do want to create the "System Reserved" partition use the outline in Step Two #3 to create, format and mark Active the System Reserved partition and then create and format the 100GB partition to do the installation to.
SSD / HDD : Optimize for Windows Reinstallation
DISKPART : At PC Startup
Try the Bootrec commands directly as per the MS guidance.
How to use the Bootrec.exe tool in the Windows Recovery Environment to troubleshoot and repair startup issues in Windows
This has solved your problem for others. Don't forget the BCD rebuild.
How to use the Bootrec.exe tool in the Windows Recovery Environment to troubleshoot and repair startup issues in Windows
This has solved your problem for others. Don't forget the BCD rebuild.
Hello again.
Too bad, perhaps the partition manager you used FUBAR'd the partition for you, just use Partition Wizard from now on mate.
You're still liable to have issues with Windows creating the "System Reserved" partition to Disk 0 as long as it's still connected though you can't disconnect it because it's a lappy.
There may be a way around it though by doing a wipe to the Disk 1 (if you reinstall) and using the outline in Step Two #3 of the tutorial at the link below to create a SysResv partition and marking that Active after the clean all and before the install.
Have a good look through the information below.
I too hope you can find a solution, just keep us updated here in this same thread, we'll do all we can to help.
What were the results for each step given here:
 �� Quote: Originally Posted by gregrocker
  All bootrec and bootsect commands are automated in Startup Repair, however if it cannot find an installation to repair you may have to run bootrec.exe /fixboot and bootrec.exe /fixmbr from the Repair Recovery Options Command Line to jump start the repair utility. Then complete attempting each step given and report back.
Unplug Disk0. or Wipe or mark System Reserved Inactive using free Partition Wizard bootable CD.
Now rightclick your System partition on Disk1, delete it and create a New Primary partition of 200mb, mark it Active.
Next boot the Win7 Repair CD or DVD Repair console to run Startup Repair up to 3 separate times (not including the first offered repair), to write the System boot files to the System partition and the Repair console to your F8 Advanced Boot Tools menu.
If this fails to start Win7, from DIsk tab on booted PW CD, select Rebuild MBR.
If that fails, delete the System partiiton and mark Win7 partiiton itself Active, then run Startup Repair x3.
Report back and we will look at other options, including copying out your files using the Load Drivers mini-explorer on Install or Repair disks, and clean reinstalling.
Now rightclick your System partition on Disk1, delete it and create a New Primary partition of 200mb, mark it Active.
Next boot the Win7 Repair CD or DVD Repair console to run Startup Repair up to 3 separate times (not including the first offered repair), to write the System boot files to the System partition and the Repair console to your F8 Advanced Boot Tools menu.
If this fails to start Win7, from DIsk tab on booted PW CD, select Rebuild MBR.
If that fails, delete the System partiiton and mark Win7 partiiton itself Active, then run Startup Repair x3.
Report back and we will look at other options, including copying out your files using the Load Drivers mini-explorer on Install or Repair disks, and clean reinstalling.
When you clone or image copy a disk with both disks connected you do need to deal with the disk signature clash. Windows 7 does not allow 2 connected disks to have the same disk signature. This is totally consistent with system repair retaining disk 0 (with it's original signature) as the location for the system reserved partition. Windows will have changed the disk signature of disk 1.
(The disk signature is in the MBR at the front of the disk.)
If you don't want to physically disconnect disk 0, then you could do a "Clean all" on this disk. This will wipe the MBR and the disk signature.
Then try the system repair again then the manual bootrec (inc. bootrec /rebuild bcd) if this doesn't work.
Also did you keep an image of the original disk 0. If so this can also be tried again after the clean.
This is why I suggested he recreate the SysReserved partitiion he copied if he wants to keep it on Disk1. Be sure to mark it Active before running the Repair, or if you want to delete it mark Win7 partition Active instead.
I'm referring to the disk signature (4 bytes) which lives on the physical MBR (first 512 bytes). This is what Windows 7 (and Vista?) uses to avoid disk collisions and is recorded also in the registry.
A clean all (even partly run) is one of the few things to completely wipe the MBR and the old disk signature on disk 0.
Unplugging the disk 0 would have avoided this but that's history. If disk 0 is looking suspect then you'll need to do it sooner or later.
A clean all (even partly run) is one of the few things to completely wipe the MBR and the old disk signature on disk 0.
Unplugging the disk 0 would have avoided this but that's history. If disk 0 is looking suspect then you'll need to do it sooner or later.
This is why I suggested he recreate the SysReserved partitiion he copied if he wants to keep it on Disk1. Be sure to mark it Active before running the Repair, or if you want to delete it mark Win7 partition Active instead.
This could be used as an outline to add the SysResv to Disk 1 though Partition Wizard would have to be used to create and format the SysResv instead of using disk management as in Step Two since Windows won't boot.
System Reserved : Create for Dual Boot
I'm referring to the disk signature (4 bytes) which lives on the physical MBR (first 512 bytes). This is what Windows 7 (and Vista?) uses to avoid disk collisions and is recorded also in the registry.
A clean all (even partly run) is one of the few things to completely wipe the MBR and the old disk signature on disk 0.
Unplugging the disk 0 would have avoided this but that's history. If disk 0 is looking suspect then you'll need to do it sooner or later.
A clean all (even partly run) is one of the few things to completely wipe the MBR and the old disk signature on disk 0.
Unplugging the disk 0 would have avoided this but that's history. If disk 0 is looking suspect then you'll need to do it sooner or later.
DISKPART : At PC Startup
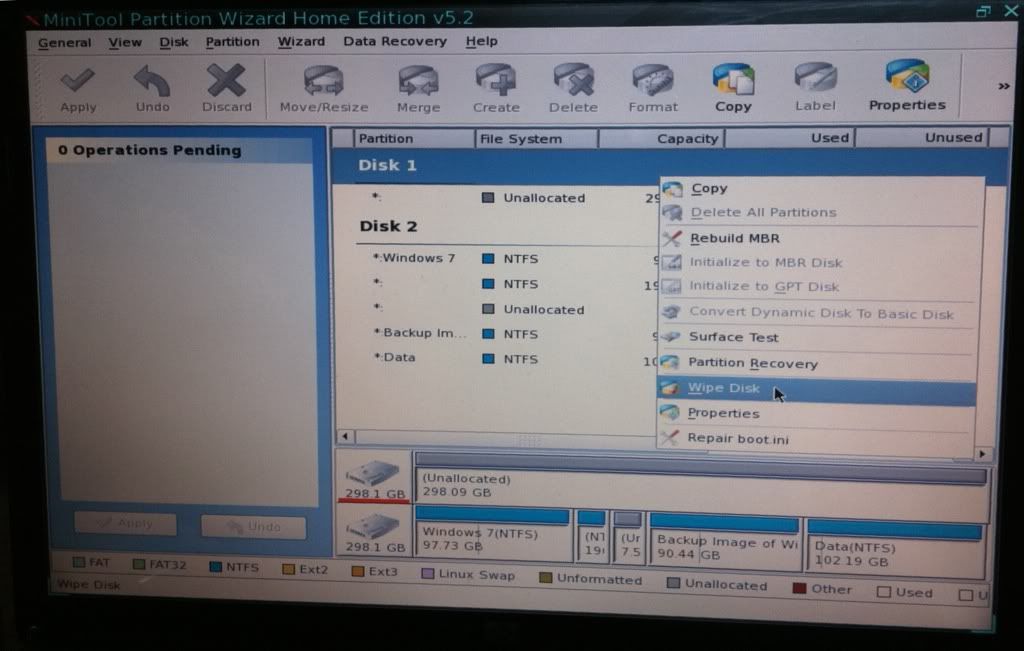
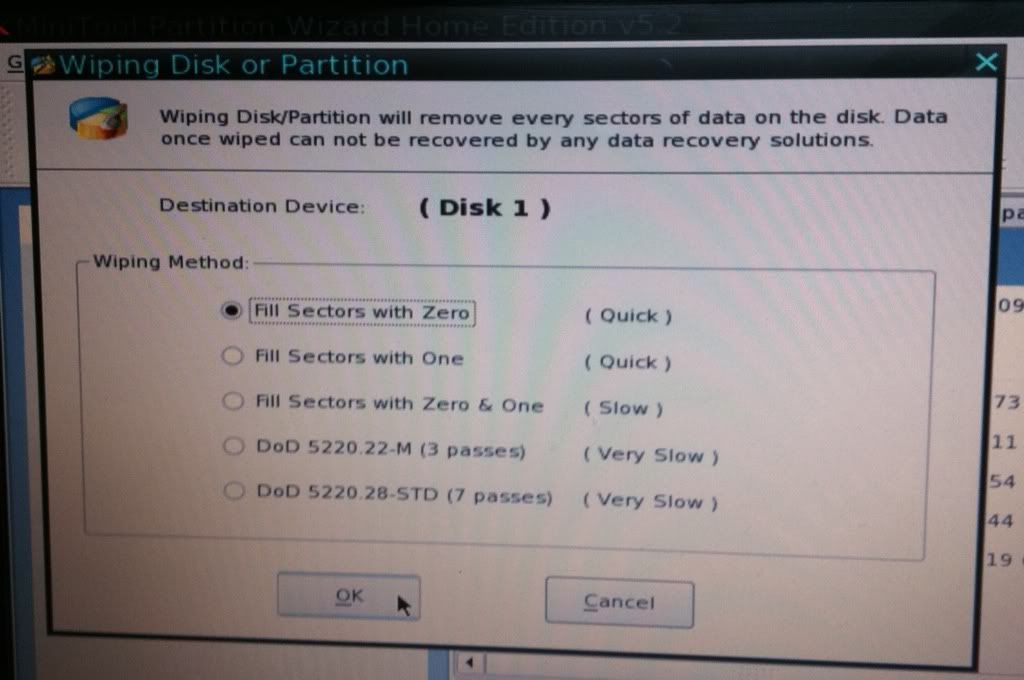
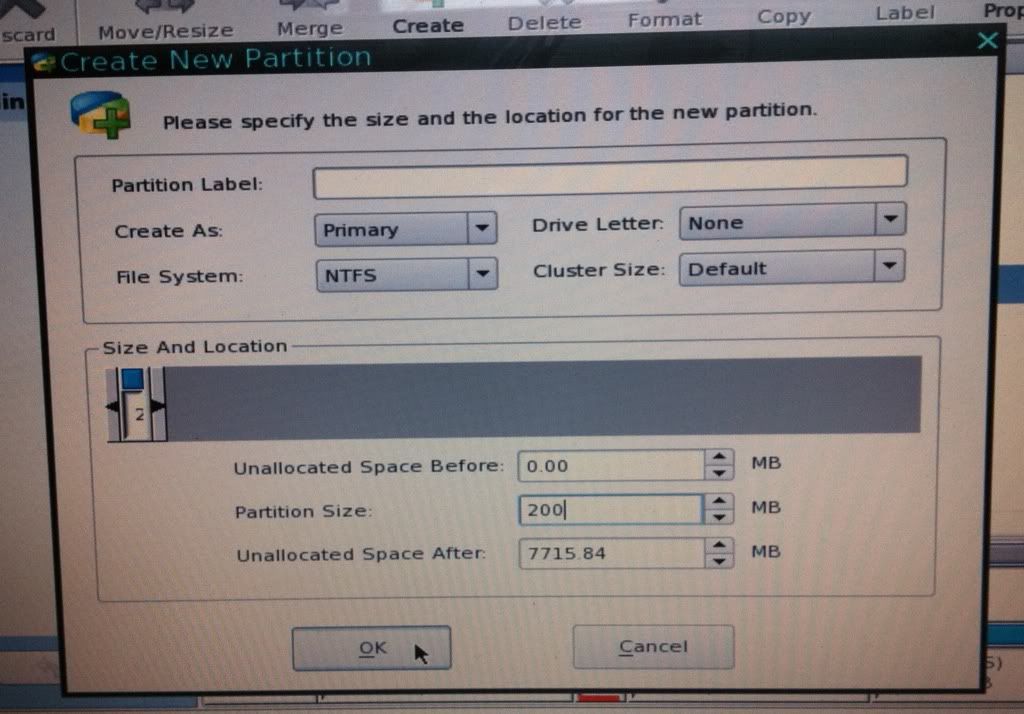
Though in this case the best way forward would be to boot the Partition Wizard boot disk and first do a wipe to write zeroes to the Disk 0 SysResv partition then delete that partition to leave unallocated space on Disk 0.
Then create, format and mark as active a new SysResv partition to the front of Disk 1 while still in Partition Wizard.
Then replace the Partition Wizard disk in the CD/DVD drive with the Windows 7 disk and restart the PC to run the 3 separate startup repairs with the restarts to the new SysResv partition on Disk 1.
Startup Repair - Run 3 Separate Times
click to enlarge

Update
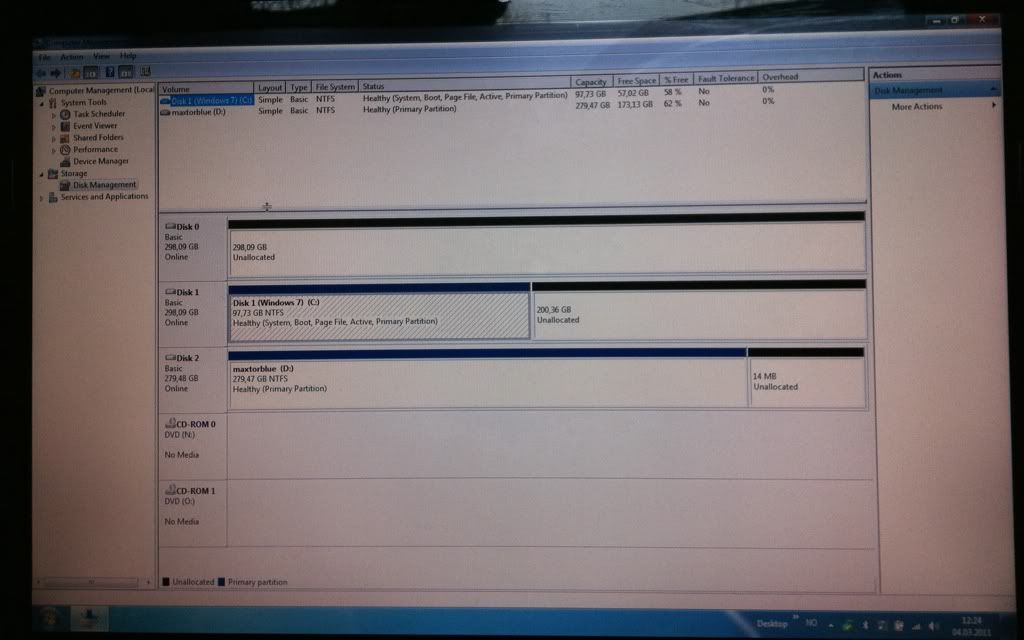
I wiped disk 0:
Then I deleted the System partition on disk 1 and then created a new 200MB primary partition.
My disks then looked like this:

Then I rebooted using my Windows 7 DVD to get to the Repair your computer option.

but the operating system doesn't appear in the list.
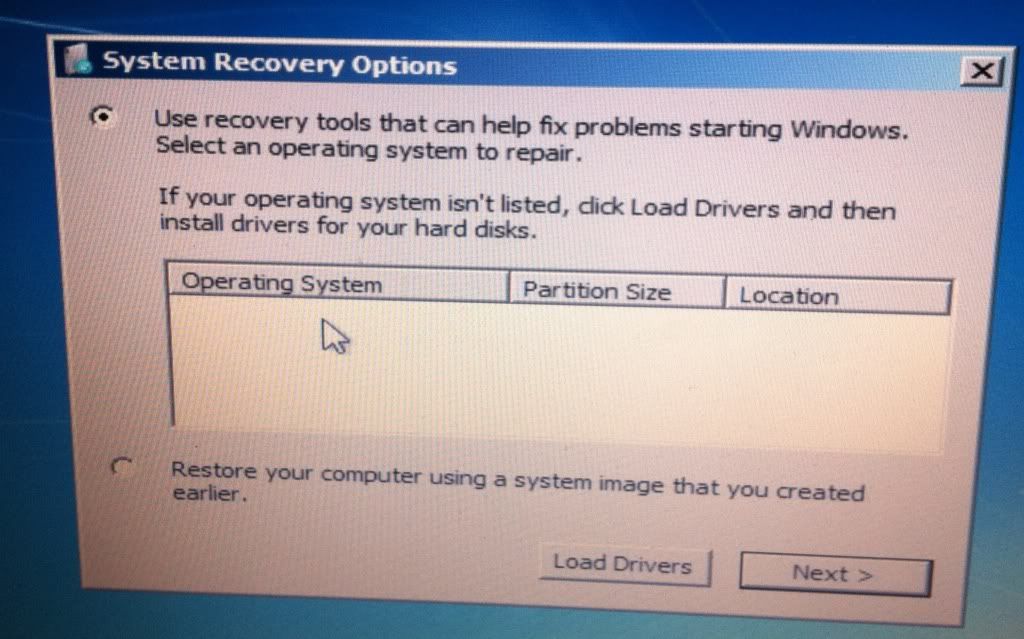
I don't want to click the Startup Repair option because whenever I do it takes ages for the operation to complete (unsuccessfully). It only seems to work if Windows appears in the list of operating systems.
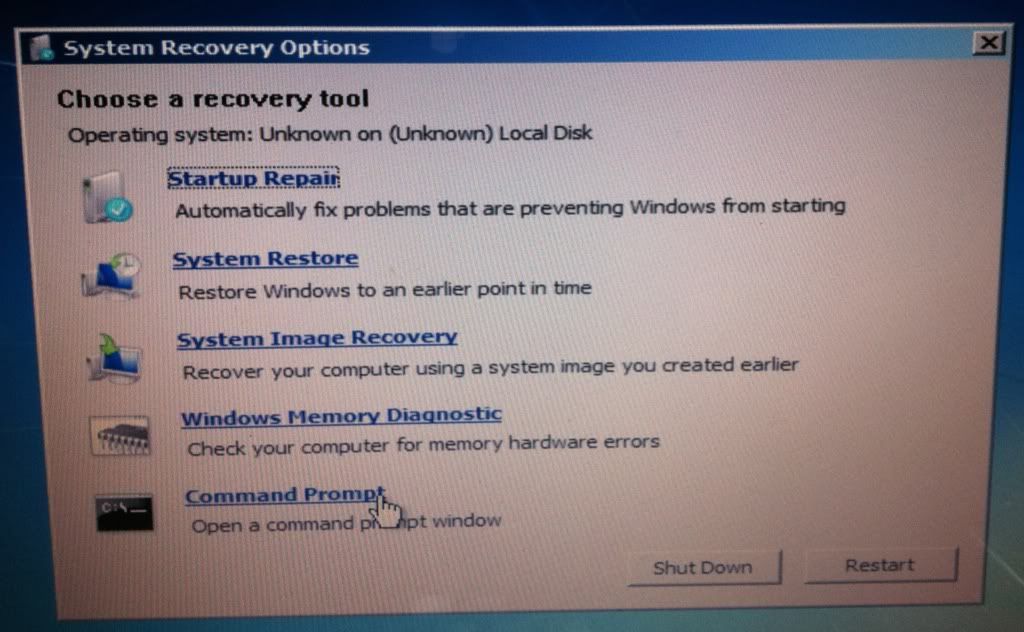
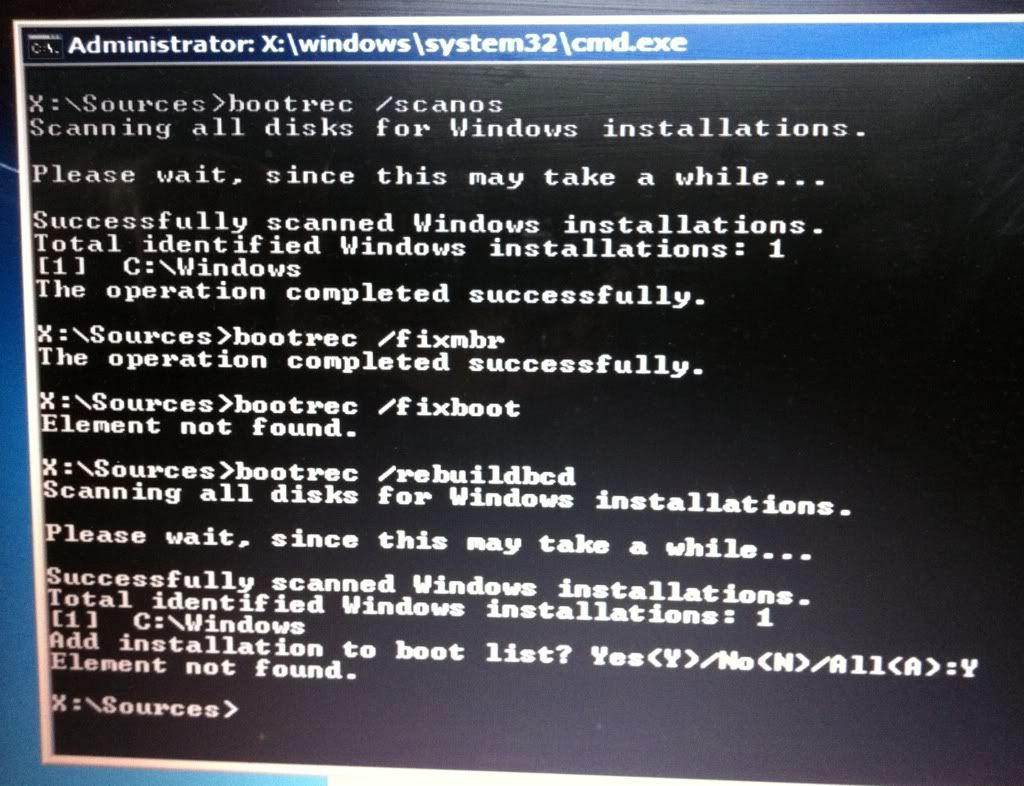
I select the Command Prompt and then perform the following commands using bootrec.
All the previous steps were done with the Windows 7 partition set as active on disk 1.
Unfortunately Windows still won't boot.
I repeat all of the pervious steps, but this time I set the 200MB partition on disk 1 as active.
Windows still won't boot.
If there was a way to get Windows to appear in the list of operating systems I'd be much more optimistic of getting Startup Repair to work.
Does this information help? I've tried to follow the advice in this thread but I'm having difficulty getting Startup Repair to work properly. Are there any ideas I can try now, or maybe there are some steps I didn't follow correctly?
I wiped disk 0:
Then I deleted the System partition on disk 1 and then created a new 200MB primary partition.
My disks then looked like this:
Then I rebooted using my Windows 7 DVD to get to the Repair your computer option.
but the operating system doesn't appear in the list.
I don't want to click the Startup Repair option because whenever I do it takes ages for the operation to complete (unsuccessfully). It only seems to work if Windows appears in the list of operating systems.
I select the Command Prompt and then perform the following commands using bootrec.
All the previous steps were done with the Windows 7 partition set as active on disk 1.
Unfortunately Windows still won't boot.
I repeat all of the pervious steps, but this time I set the 200MB partition on disk 1 as active.
Windows still won't boot.
If there was a way to get Windows to appear in the list of operating systems I'd be much more optimistic of getting Startup Repair to work.
Does this information help? I've tried to follow the advice in this thread but I'm having difficulty getting Startup Repair to work properly. Are there any ideas I can try now, or maybe there are some steps I didn't follow correctly?
Bare Foot Kid, I'll have a look at your post tonight. Thanks.
I'm referring to the disk signature (4 bytes) which lives on the physical MBR (first 512 bytes). This is what Windows 7 (and Vista?) uses to avoid disk collisions and is recorded also in the registry.
A clean all (even partly run) is one of the few things to completely wipe the MBR and the old disk signature on disk 0.
Unplugging the disk 0 would have avoided this but that's history. If disk 0 is looking suspect then you'll need to do it sooner or later.
A clean all (even partly run) is one of the few things to completely wipe the MBR and the old disk signature on disk 0.
Unplugging the disk 0 would have avoided this but that's history. If disk 0 is looking suspect then you'll need to do it sooner or later.
I'm not sure if "Wipe all" in Partition Wizard wipes the MBR.
If the MBR is cleared then disk 0 should not be initializing which is what I was suggesting.
Getting late , got to go. Hope you make progress.
The only way I've been able to get Win7 with Active SysReserved or OS partition to be force recognized in WinRE is using the bootrec.exe /fixboot and /fixmbr.
Try also Rebuild MBR from PW CD
Try also Rebuild MBR from PW CD
Well, I decided to wipe disk 0 (already done) and disk 1 (in progress). Starting with a clean slate my make things clearer to me.
Once that's finished I'm going to restore my backup image of Windows 7 to my disk 1. If it doesn't boot then I'll repeat the steps that have been described to me earlier: create a 200mb primary partition, mark Windows partition as active, perform System Restore x 3, etc.
I'll keep the thread updated on any progress.
I really hope wiping the disk 1 wasn't a big mistake!!
I really hope wiping the disk 1 wasn't a big mistake!!
If you haven't already done it, maybe make disk 1 (2nd disk) rather than disk 0 the primary boot disk in the BIOS boot list.
I just started a simulation in VirtualBox and it just started installing, I'll be back after, whether it works or not.
click to enlarge

I really hope wiping the disk 1 wasn't a big mistake!!
If you haven't already done it, maybe make disk 1 (2nd disk) rather than disk 0 the primary boot disk in the BIOS boot list.
 to you guys for sticking with it. I appreciate the help.
I'll keep updating until the issue is resolved or I give up and do a clean install.
OK no surprise here, I have another plan, I'll be back.

This looks promising, we'll see after the install though I did get the dialog box that Windows may create additional partitions for the install.


No dice, it gave the one I created a drive letter I'm going to remove and created one on Disk 0
I have one more thing to try, I'll be back.
I have one more thing to try, I'll be back.

If WinRE won't see the installation to repair, and both bootrec.exe /fixboot and /fixmbr won't jumpstart it to appear with either the 100mb or the Win7 OS partitions marked Active (try both) then this may not be salvageable.
If you need to copy out your files you can use the Load Drivers mini-explorer on the DVD or Repair CD.
As a last resort I would try to SysPrep the original Win7 HD, after reapplying the image to it if necessary. This will remove the Disk Signature which as Michael explained is likely conflicting . Then you can capture your image and reimage to DISK1, mark Active and run Repairs hopefully without interference.
( Ted can u post up Kari's Move OS to another Drive Sysprep tutorial as I am in DFW airport and linkless.)
It appears you are eager to learn, and this is some of the most advanced stuff we do here.
Well it's not going to work.
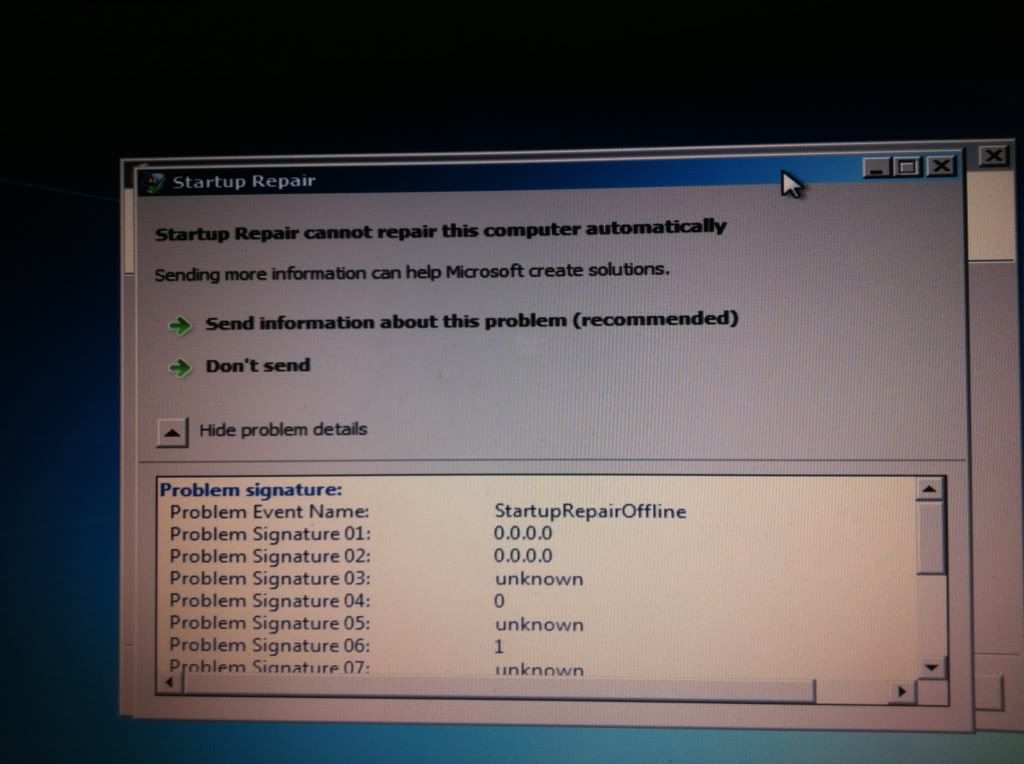
I used Partition Wizard to wipe the Disk 0 SysResv and then used diskpart to mark it offline then tried the startup repairs and the first time it ran about 10 minutes then I got the "cannot repair" dialog box but I'm running it a second time though I'm not holding out much hope.
OK the second startup repair just error-d out the same as the first.
Sorry mate, I thought it would work.


( Ted can u post up Kari's Move OS to another Drive Sysprep tutorial as I am in DFW airport and linkless.)
Sure thing mate.
Windows 7 Installation - Transfer to a New Computer
Here's Ray's "copy out" tutorial also.
How to Copy & Paste in Recovery Console on Windows 7 or Vista
- From my backup image, I have recovered the OS to the other drive (2nd drive). Then I got boot up problems (wouldn't boot) so I used the Windows 7 DVD to System Repair. This allowed me to boot up, but it seems to have created a System reserved partition on the 1st drive (I want everything on the 2nd drive), and everything else seems to be on the other drive (1st drive).
At the risk of dragging out the pain...
Your 1st post suggests you have a valid image. I'd like to hear the results of your last strategy (post #26).
I thought perhaps I could out-smart it, I guess not.
click to enlarge


If WinRE won't see the installation to repair, and both bootrec.exe /fixboot and /fixmbr won't jumpstart it to appear with either the 100mb or the Win7 OS partitions marked Active (try both) then this may not be salvageable.
If you need to copy out your files you can use the Load Drivers mini-explorer on the DVD or Repair CD.
As a last resort I would try to SysPrep the original Win7 HD, after reapplying the image to it if necessary. This will remove the Disk Signature which as Michael explained is likely conflicting . Then you can capture your image and reimage to DISK1, mark Active and run Repairs hopefully without interference.
( Ted can u post up Kari's Move OS to another Drive Sysprep tutorial as I am in DFW airport and linkless.)
It appears you are eager to learn, and this is some of the most advanced stuff we do here.
If you need to copy out your files you can use the Load Drivers mini-explorer on the DVD or Repair CD.
As a last resort I would try to SysPrep the original Win7 HD, after reapplying the image to it if necessary. This will remove the Disk Signature which as Michael explained is likely conflicting . Then you can capture your image and reimage to DISK1, mark Active and run Repairs hopefully without interference.
( Ted can u post up Kari's Move OS to another Drive Sysprep tutorial as I am in DFW airport and linkless.)
It appears you are eager to learn, and this is some of the most advanced stuff we do here.
I was trying to work out a way for you to do a clean install with the old/bad Disk 0 still connected but I couldn't sort a method so far, if you can't find a way to disconnect the Disk 0 data cable from the motherboard; Sysprep does seem your best bet at this point.
- From my backup image, I have recovered the OS to the other drive (2nd drive). Then I got boot up problems (wouldn't boot) so I used the Windows 7 DVD to System Repair. This allowed me to boot up, but it seems to have created a System reserved partition on the 1st drive (I want everything on the 2nd drive), and everything else seems to be on the other drive (1st drive).
At the risk of dragging out the pain...
Your 1st post suggests you have a valid image. I'd like to hear the results of your last strategy (post #26).
Created 200mb active primary partition on disk 1.
Restored backup image to disk 1.
Failed to boot.
Used Windows DVD (bootrec stuff) - didn't work.
I gave up on this and tried something else:
Deleted all partitions on disk 0 and disk 1.
Did a clean install of Windows 7 to disk 1 - it works.
Then I used my backup image to recover Windows to disk 1 - it works, but not as I want it to. All my programs, settings, etc are back, but I still have my original problem of having my system partition (created by Windows) on disk 0 I want it on disk 1).
So basically I'm back to square 1

Now I am going to repeat the above steps and get everything back onto the failing disk (disk 0). From there I am thinking of making a new backup image and pay closer attention to what I am doing. Maybe a new and improved backup image of Windows on the disk where it was originally located (disk 0) will help my get closer to my ultimate goal of moving the whole lot to disk 1.
Phew!
Any feedback is always welcome. Feel free to use me as a guinea pig for any crazy suggestions you want to try out

I would suggest if you are going to do a clean install to Disk 0 that you do not create / let Windows create the System Reserved partition, that will be a big help moving the image successfully when you try that.
Here's how, boot to diskpart and run these commands exactly, just leave the "quick" off, that will let it run a full format, I just added the quick argument to speed it up for me and I'm not actually going to run the install.
Here's how, boot to diskpart and run these commands exactly, just leave the "quick" off, that will let it run a full format, I just added the quick argument to speed it up for me and I'm not actually going to run the install.
click to enlarge

I was trying to work out a way for you to do a clean install with the old/bad Disk 0 still connected but I couldn't sort a method so far, if you can't find a way to disconnect the Disk 0 data cable from the motherboard; Sysprep does seem your best bet at this point.

When I was installing the backup image of Windows I was asked where I wanted to install it. The unusual thing is that my external hard disk was labelled disk 0, and my laptop disks were labelled disk 1 and disk 2. So, I decided to installed it to what it was calling disk 1, even though it's really disk 0. My view from Computer Management seems to suggest that the problem is solved:
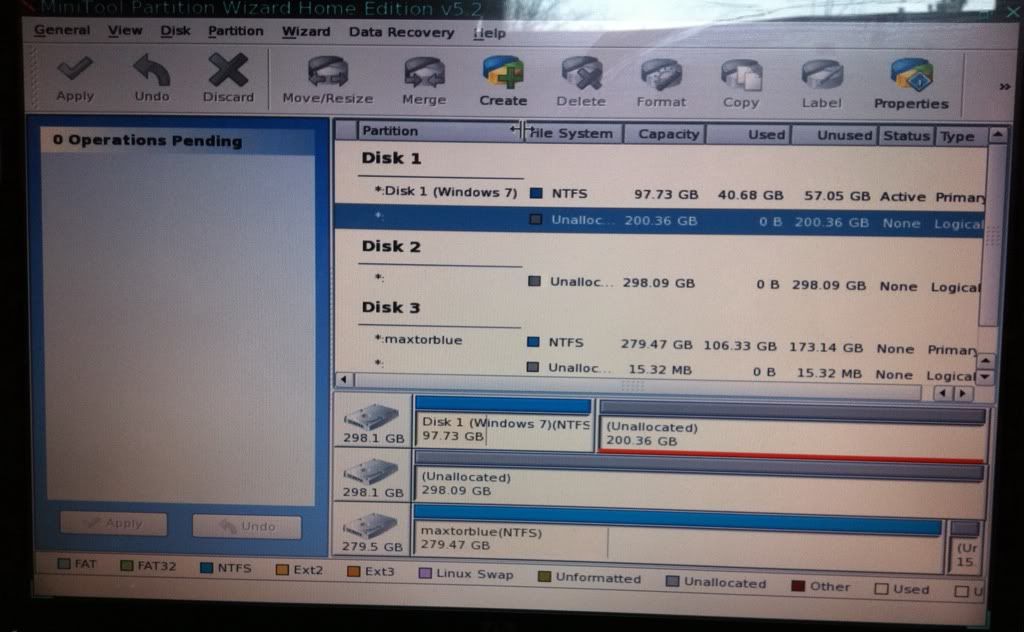
but my view in Partition Manager makes my doubt it:
My laptop is being surprisingly quiet now, but that's not proof because sometimes the "clicking sound" does go away temporarily.
How do I tell if Windows is on the faulty disk (disk 0) or the healthy one (disk 1)?
Deleted all partitions on disk 0 and disk 1.
Did a clean install of Windows 7 to disk 1 - it works.
Then I used my backup image to recover Windows to disk 1 - it works, but not as I want it to. All my programs, settings, etc are back, but I still have my original problem of having my system partition (created by Windows) on disk 0 I want it on disk 1).
So basically I'm back to square 1
Once you do this, try marking the reimaged Win7 active and running the repairs to see if it will recover the System boot files into the image. If not, we can help you chop down the installed Win7 into a 200mb System Reserved partition by deleting all but the boot files.
Now, looking at screenshots just posted I see you have something different than described. Disk Mgmt looks correct - will that installation start on its own?
To find out which HD is clicking, enter BIOS setup to temporarily disable DISK0. This might also enable your repairs to work better if you still need to move System files to Win7 as Partition Wizard indicates - keep in mind that we've found PW boot CD is the ultimate authority with conflicting views like this.
[I'm using terminology Disk0 and Disk1]
In your post #26 attempt did you change the BIOS as I suggested? Did you place the 2nd disk (disk 1) at the first boot option?
If you are following your new strategy then try using the windows inbuilt imaging as well. It images Sys reserved AND c: (Windows OS partition). It reimages both.
But more basically.
(1) Do you know which of the HDDs is "clicking" in the first place. Is the clicking a regular sound? Head movements will make some noise and Windows 7 can do a lot of housekeeping when you're doing nothing.
(2) Can you get hold of any service manual for your laptop or similar laptop to see what the disassembly steps are. You need to know how to get to your HDDs eventually.
Deleted all partitions on disk 0 and disk 1.
Did a clean install of Windows 7 to disk 1 - it works.
Then I used my backup image to recover Windows to disk 1 - it works, but not as I want it to. All my programs, settings, etc are back, but I still have my original problem of having my system partition (created by Windows) on disk 0 I want it on disk 1).
So basically I'm back to square 1
Did a clean install of Windows 7 to disk 1 - it works.
Then I used my backup image to recover Windows to disk 1 - it works, but not as I want it to. All my programs, settings, etc are back, but I still have my original problem of having my system partition (created by Windows) on disk 0 I want it on disk 1).
So basically I'm back to square 1
I installed it in the same position as the clean install of Windows. So maybe I just overwrote it?
I started the image just by booting as normal. I think the clean install created a system partition on disk 0 which helped my restored backup Windows to start. It seemed as if virtually everything was on disk 1 and the system partition was on disk 0. It's messy but it allowed me to boot normally.
Once you do this, try marking the reimaged Win7 active and running the repairs to see if it will recover the System boot files into the image. If not, we can help you chop down the installed Win7 into a 200mb System Reserved partition by deleting all but the boot files.
Now, looking at screenshots just posted I see you have something different than described. Disk Mgmt looks correct - will that installation start on its own?
Yes, starts on it's own.
To find out which HD is clicking, enter BIOS setup to temporarily disable DISK0. This might also enable your repairs to work better if you still need to move System files to Win7 as Partition Wizard indicates - keep in mind that we've found PW boot CD is the ultimate authority with conflicting views like this.
Now that I think about it, I'm 99% sure that everything is working the way I want it. When I hear the clicking/rattling noise from my disk, the activity light at the front is off. When I do a quick virus scan, the light flickers, but the noise remains constant. I think the noise I'm hearing is the old, empty disk just spinning. It's not accessing anything or doing anything, it's just spinning noisily. My next step will be to disable this and then I'll be left with my lovely Windows 7 installation on a healthy disk
.I'm going to create a new backup of this, just in case I want to do some more tinkering!
You guys were such a great help to me - thanks! I guess you can consider my original answer solved, unless anyone has anything else to add. If there's any info you want about my system I'll check back here and reply.
[I'm using terminology Disk0 and Disk1]
In your post #26 attempt did you change the BIOS as I suggested? Did you place the 2nd disk (disk 1) at the first boot option?
I didn't. I couldn't find out how to do it. None of the options fitted what I wanted.
If you are following your new strategy then try using the windows inbuilt imaging as well. It images Sys reserved AND c: (Windows OS partition). It reimages both.
I didn't know Windows had built in imaging. I always assumed 3rd party software would be better for that kind of thing. Also, I've been really happy with Paragon's free backup and recovery software. I've used it several times in the past few weeks to backup and restore my system and it hasn't failed me once. It has allowed me to do complicated things like backup and restoring images without knowing much about the technical definitions (MBR, system reserved partition, etc). Although this thread has help a lot with that.
But more basically.
(1) Do you know which of the HDDs is "clicking" in the first place. Is the clicking a regular sound? Head movements will make some noise and Windows 7 can do a lot of housekeeping when you're doing nothing.
It's quite regular with occasional quiet periods. It's definitely a bad sound. It's very different to the sounds a hard working disk makes. I'm pretty sure it's my disk 0. I do some intensive tasks there - video editing, etc so I can see how it would get damaged over time.
(2) Can you get hold of any service manual for your laptop or similar laptop to see what the disassembly steps are. You need to know how to get to your HDDs eventually.
By the time the 2nd one goes I'll be ready to upgrade to a better laptop
Không có nhận xét nào:
Đăng nhận xét